如需阅读全文,请关注公众号TesterTalk索要密码。
unittest是python自带的单元测试框架,它封装好了一些校验返回的结果方法和一些用例执行前的初始化操作,使得单元测试易于开展,因为它的易用性,很多同学也拿它来做功能测试和接口测试,只需简单开发一些功能(报告,初始化webdriver,或者http请求方法)便可实现。
但自动化测试中我们常常需要根据不同需求挑选部分测试用例运行,并且我们希望用例克服环境不稳定的局限,即运行失败后自动重新运行一次,如果成功就认为是环境问题导致第一次失败,还有我们经常希望测试用例可以并发执行等等,这些unittest都做不到或者需要大量二次开发才能做到,那么有没有更加强大的框架可以替代unittests呢?
pytest是python里的一个强大框架,它可以用来做单元测试,你也可以用来做功能,接口自动化测试。而且它比unittest支持的功能更多更全面。但是pytest在Getstarted里给出的实例却很简单,很多同学错以为它只是跟unittest一样是个单元测试框架罢了,如果你查询中文互联网,你也只能找到寥寥数篇大致一样的用法,可以说pytest的精髓使用,没有被大家挖掘出来,如此强大的框架不应该被埋没,今天我就带领大家深入pytest使用,共同领略pytest的强大。
1.pytst安装
pytest不属于python的标准库,所以需要安装才能使用, 安装方式如下:
如果你已经安装有pytest,想查看它的版本号:
2.你的第一个pytest测试
|
|
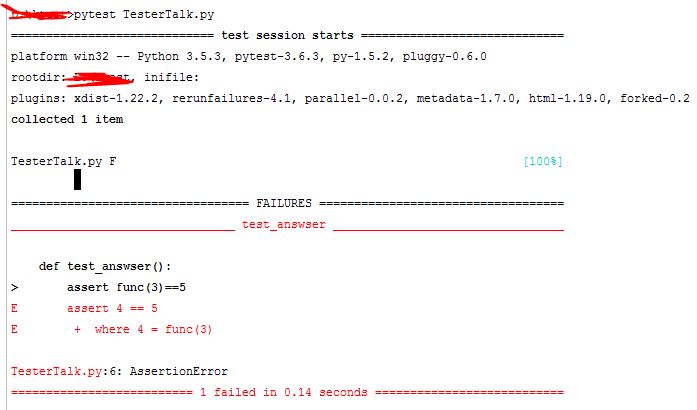
非常简单吧, 如果想运行多个用例该如何做呢?
注意:
(1).如果你想用pytest寻找整个文件夹下的测试用例,那么文件须以test_开头或者以test结尾。
(2).测试类以Test开头,并且不能带有 init 方法。
(3).测试函数以test开头。
(4).另外,pytest不支持也不打算支持中文路径,如果项目路径中有中文会报错。
好了,pytest的getStarted就结束了, 看了上面的应用方式的确没觉得它哪里强大。 别着急,我们再来想一想,如果你有个测试框架,你希望如何用这个框架做测试?
3.灵活的指定测试用例运行集。
在unittest框架里,你只能通过suite.addTest(),或者defaultTestLoader.Discover()两种方法在查找测试用例,对于你不需要的测试用例,只能用@unittest.skip()
来忽略,但做不到不改动代码变更测试用例集,pytest很好的实现了这一点,它支持如下查找:
难道就仅限于此吗? 其实pytest帮我们实现了更多的高级功能,比如:
4.并发运行测试用例集
关注公众号TesterTalk,跟我一起关注测试技术
首先,你得安装个插件:
其次,要注意区这个插件仅仅支持python3.6版本及以上,而且如果你想多进程并发,必须跑在Unix或者Mac机器上,windows环境仅仅支持多线程运行。
运行上需要指定参数:
–workers (optional) X。 多进程运行, X是进程数。 默认值1。
–tests-per-worker (optional) X. 多线程运行, X是每个worker运行的最大并发线程数。 默认值1。
举例来说:
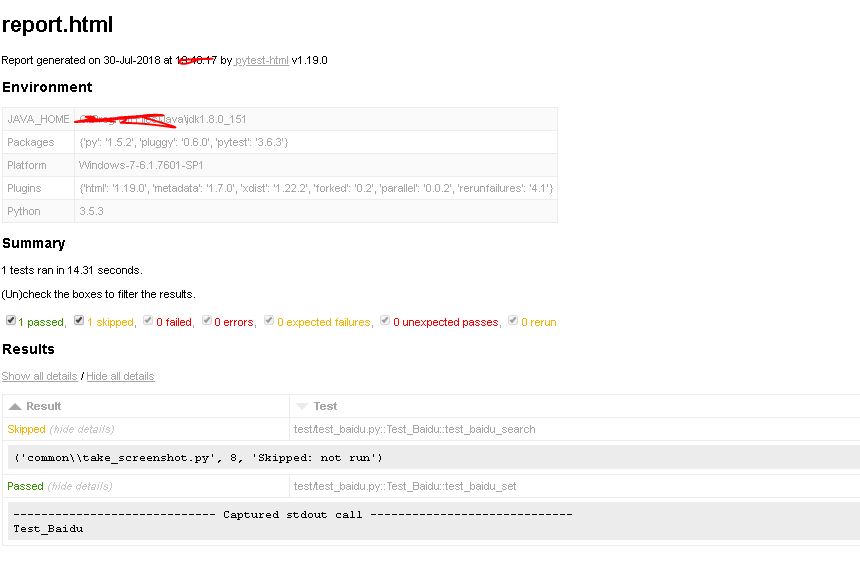
5.测试报告优化
|
|
生成的结果如下: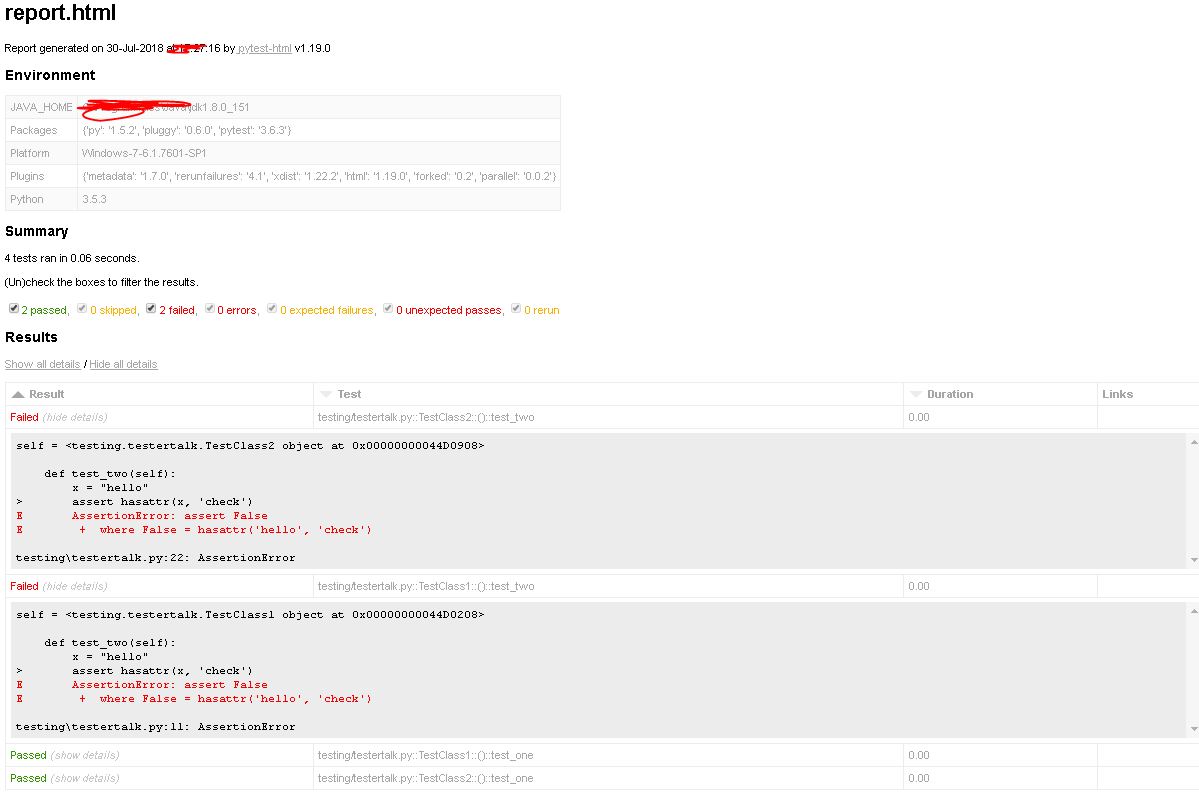
有时候,我们需要克服环境问题,让失败的用例rerun,有没有办法呢?
生成的结果如下: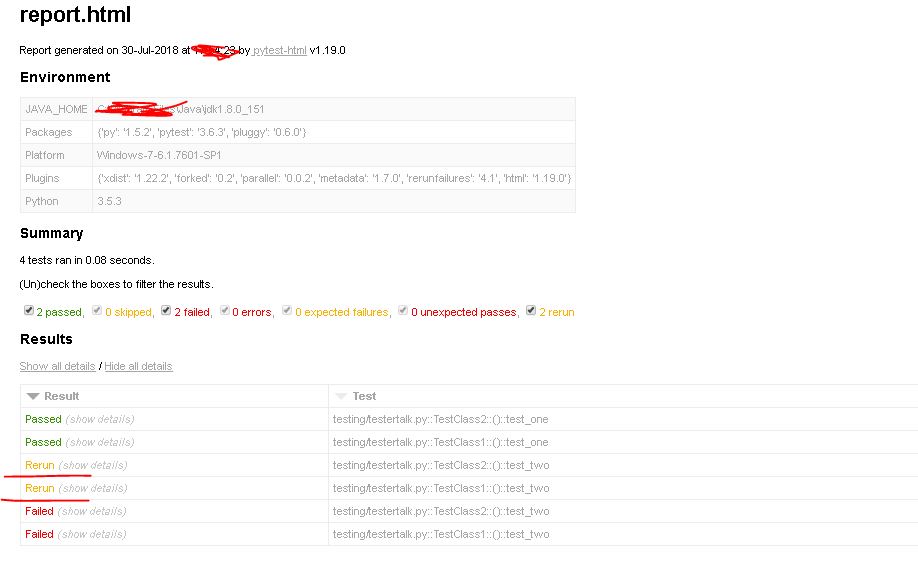
可以看到,rerun聚合在了报告里。
我们自动化一般用到持续集成,Jenkins里需要junit XML格式的报告,pytest有没有办法直接生成?
这就结束了吗?还远呢?数据参数化你了解下?
6.数据参数化
pytest有几种数据参数化方式:
pytest.fixture(). 不带参数
pytest.fixture(), 带parms参数:
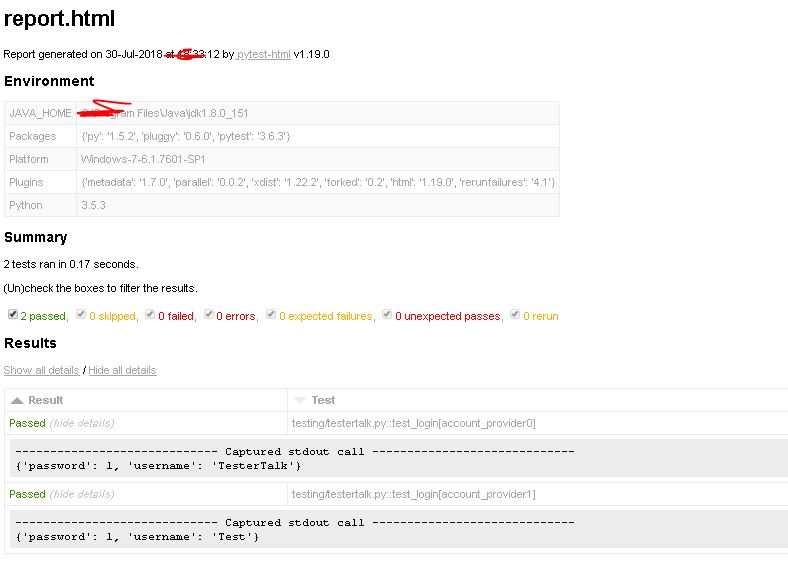
params with @pytest.fixture, a list of values for each of which the fixture function will execute and can access a value via request.param.
report显示下图,可以看到test_login被执行了2遍,每次执行带入的数据不同:
除了直接用pytest.fixture, 还可以这么用:
pytest.mark.usefixtures()
|
|
pytest固然强大,这就结束了吗?还有什么高阶的功能吗?必须的。
7.pytest.mark.parametrize实现数据驱动
|
|
如果我的数据来自外部文件呢?
到这里为止,你已经学习了pytst的基础功能,高阶功能,还有什么吗? 如果你之前的框架是unittest, pytest支持无缝切换, 你不需要改任何代码。
记得上次直播我分享的unittest实现的自动化框架吗,我们看看这个page: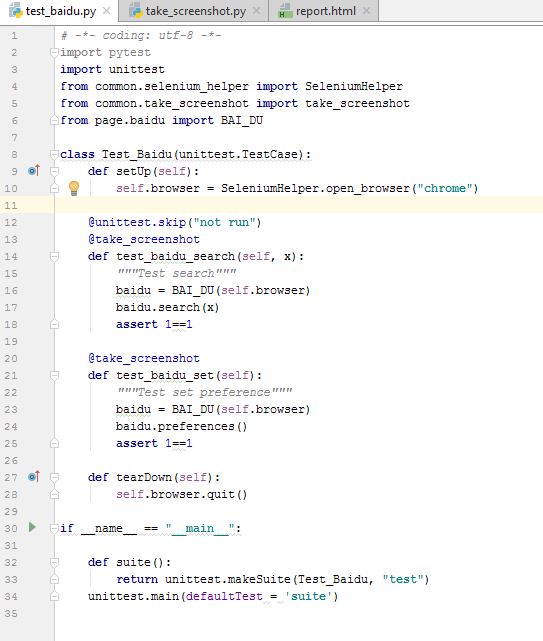
这个是unittest实现的测试类,我们之间在terminal里运行
怎么样,就问你惊喜不惊喜?刺激不刺激!
当然,pytest的特色还远不只与此,我们最后介绍一个高级特性,它允许你在用例运行的整个session里,或者一个module里共享测试数据。
8.作用域(scope)实现数据共享(autouse)
我们知道,fixture,允许你不带参数运行和带参数运行, 调用fixture的第三种方式就是使用autouse
fixture decorator一个optional的参数是autouse, 默认设置为False。 当默认为False,就可以选择用上面两种方式来试用fixture。 当设置为True时,在一个session内的所有的test都会自动调用这个fixture。 权限大,责任也大,所以用该功能时也要谨慎小心。
举例来说,我想初始化我的浏览器,但是我不想每次测试运行都初始化,怎么办呢?我可以用scope限制住。
首先要建立一个conftest.py文件:
其次,写我们的测试类
fixture的存在使得我们在编写测试函数的准备函数、销毁函数或者多个条件的测试提供了更加灵活的选择。
autouse的scope含义如下:
autouse fixtures obey the scope= keyword-argument: if an autouse fixture has scope=’session’ it will only be run once, no matter where it is defined. scope=’class’ means it will be run once per class, etc.
if an autouse fixture is defined in a test module, all its test functions automatically use it.
if an autouse fixture is defined in a conftest.py file then all tests in all test modules below its directory will invoke the fixture.
好了讲到这里,谁还认为pytest不够强大的?! pytest绝对是你开展功能自动化测试,接口自动化测试的利器,希望大家都可以用起来!