iTesting软件测试知识分享

测试框架实践--多线程

前面几次的分享,我从一个数据驱动的实现展开去,先后讨论了什么是数据驱动,如何实现数据驱动,数据驱动在自动化框架里如何应用。
测试框架–教你用Python实现数据驱动1
测试框架–教你用Python实现数据驱动2
测试框架–数据驱动动态增加测试用例
测试框架实践–动态挑选待运行测试用例

为什么要讲这些呢?

因为这些是一个测试框架必不可少的部分,看看前面4次的分享,虽然可以成功的运行,但我们采用了顺序运行的方式,跟实际使用相差很远,现实中我们一般实现“并发”运行我们的测试用例。

说起并发,Python 有多线程(Multiple Threading)和多进程(Multiple Process)之分, 由于GIL即Global Interpreter Lock(全局解释器锁)的存在,python多线程并不能实现真正的并发(无论你的CPU是否多核),相反,多进程因为有独占的内存空间可以真正的实现并发。但在我们的自动化测试框架里,我们还是希望利用线程的公用内存空间特性,特别是同一个测试类我们希望有统一的setup, teardown特性。而这个多进程就不太适用,加上我们测试用例也不是CPU计算密集型,多线程方案的“并发”看起来是最佳选择。

但是是不是就一定要用threading.Thread呢?

我们先看看”传统“的多线程并发。 一个通用的多线程模板是这样的:

1
2
3
4
5
6
7
8
9
10
11
12
13
14
15
16
17
18
19
20
21
22
23
24
25
26
27
28
29
30
31
32
33
34
35
36
37
38
39
40
41
42
43
44
45
46
47
import threading
import queue
import time
exitFlag = 0
class MyThread(threading.Thread):
def __init__(self, q):
threading.Thread.__init__(self)
self.q = q
def run(self):
do_something(self.q)
def do_something(q):
while not exitFlag:
queue_lock.acquire()
if not work_queue.empty():
data = q.get()
queue_lock.release()
print("Now thread %s is processing %s" % (threading.currentThread(), data))
time.sleep(1)
else:
queue_lock.release()
if __name__ == "__main__":
num_worker_threads = 3
target_case = ['case1', 'case2', 'case3', 'case4', 'case5']
queue_lock = threading.Lock()
work_queue = queue.Queue()
threads = []
start_time = time.time()
# Create new thread
for case in range(num_worker_threads):
thread = MyThread(work_queue)
thread.start()
threads.append(thread)
# Fill queue
queue_lock.acquire()
for case in target_case:
work_queue.put(case)
queue_lock.release()
# Wait queue empty
while not work_queue.empty():
pass
# Notify thread quite
exitFlag = 1
# Wait all threads done
for t in threads:
t.join()
end_time = time.time()
print("All cases finished with running time --%s" % (end_time - start_time))

把我们前面实现的顺序运行改成并发, 只需要改成如下就可以实现多线程:
1
2
3
4
5
6
7
8
9
10
11
12
13
14
15
16
17
18
19
20
21
22
23
24
25
26
27
28
29
30
31
32
33
34
35
36
37
38
39
40
41
42
43
44
45
46
47
48
49
50
51
52
53
54
55
56
57
58
59
60
61
62
63
64
65
66
67
68
69
import threading
import queue
import time
from common.test_case_finder import DiscoverTestCases, unpack_test_cases_from_functions
exitFlag = 0
def f(case):
name, func, value = case
try:
if value:
func.__call__(name, *value)
else:
func.__call__(name)
except:
# traceback.print_exc()
cases_run_fail.append(name)
else:
cases_run_success.append(name)
return cases_run_fail, cases_run_success
class MyThread(threading.Thread):
def __init__(self, q):
threading.Thread.__init__(self)
self.q = q
def run(self):
while not exitFlag:
queue_lock.acquire()
if not work_queue.empty():
data = self.q.get()
f(data)
time.sleep(5)
queue_lock.release()
print("Now thread %s is processing %s" % (threading.currentThread(), data))
else:
queue_lock.release()
if __name__ == "__main__":
num_worker_threads = 5
mypath = r"D:\ktest\tests\test_page1"
cases_to_run = []
cases_run_success = []
cases_run_fail = []
discover_cases = DiscoverTestCases(mypath)
mds = discover_cases.get_modules_spec()
raw_test_cases = discover_cases.find_classes_in_module(mds)
cases_to_run = unpack_test_cases_from_functions(raw_test_cases)
queue_lock = threading.Lock()
work_queue = queue.Queue()
threads = []
start_time = time.time()
# Create new thread
for case in range(num_worker_threads):
thread = MyThread(work_queue)
thread.start()
threads.append(thread)
# Fill queue
queue_lock.acquire()
for case in cases_to_run:
work_queue.put(case)
queue_lock.release()
# Wait queue empty
while not work_queue.empty():
pass
# Notify thread quite
exitFlag = 1
# Wait all threads done
for t in threads:
t.join()
end_time = time.time()
print("All cases finished with running time --{:.2f} seconds" .format(end_time - start_time))
print('Below cases are passed:\n %s' %cases_run_success)
print('Below cases are failed:\n %s' % cases_run_fail)

可以看到,你自己要做很多事情来保证多线程的正常运行,你要维护queue,要注意资源锁,你要使用join来等待子线程都完成。 多线程难道都这么麻烦吗?

“人生苦短,我用python”不知道你们听过没 :)

multiprocessing.dummy 来助你一臂之力!

dummy是multiprocessing的一个克隆体,唯一的区别在于,dummy使用线程而multiprocessing使用进程。

1
2
3
4
5
6
7
8
9
10
11
12
13
14
15
16
17
18
19
20
21
22
23
24
25
26
27
28
29
30
31
32
33
34
35
from multiprocessing.dummy import Pool as ThreadPool
import time
from common.test_case_finder import DiscoverTestCases, unpack_test_cases_from_functions
def f(case):
name, func, value = case
try:
if value:
func.__call__(name, *value)
else:
func.__call__(name)
except:
# traceback.print_exc()
cases_run_fail.append(name)
else:
cases_run_success.append(name)
return cases_run_fail, cases_run_success
if __name__ == "__main__":
number_of_threads = 5
mypath = r"D:\ktest\tests\test_page1"
cases_to_run = []
cases_run_success = []
cases_run_fail = []
discover_cases = DiscoverTestCases(mypath)
mds = discover_cases.get_modules_spec()
raw_test_cases = discover_cases.find_classes_in_module(mds)
cases_to_run = unpack_test_cases_from_functions(raw_test_cases)
start_time = time.time()
with ThreadPool(number_of_threads) as p:
p.map(f, cases_to_run)
p.close()
p.join()
end_time = time.time()
print('Below cases are passed:\n %s' %cases_run_success)
print('Below cases are failed:\n %s' % cases_run_fail)
print("All cases finished with running time --{:.2f} seconds" .format(end_time - start_time))

看下图,左边是传统的threading.Thread的多线程用法, 右边是multipleprocess.dummy的用法。

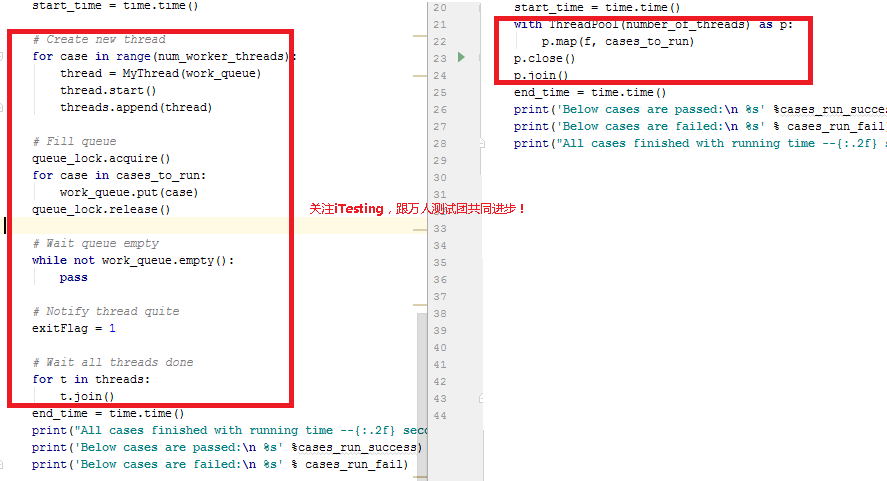
除开定义Thread类外,threading.Thread还用了这么多篇幅才能令多线程工作,但multiprocessing.dummy只用一个Pool就全搞定了。

好了,今天我们讲到这里,并发也实现了,动态挑选也实现了,一个测试框架就搭起来来, 后面就是增强了, 下一期来实现test fixture, 敬请期待!

🐶 您的支持将鼓励我继续创作 🐶
-------------评论, 吐槽, 学习交流,请关注微信公众号 iTesting-------------
请关注微信公众号 iTesting wechat
扫码关注,跟作者互动

本文标题:测试框架实践--多线程

文章作者:请关注微信公众号 iTesting

发布时间:2018年11月16日 - 23:11

最后更新:2018年12月28日 - 00:12

原始链接:http://www.helloqa.com/2018/11/16/测试框架/测试框架实践--多线程/

许可协议: 署名-非商业性使用-禁止演绎 4.0 国际 转载请保留原文链接及作者。